
The SRA Principle and How to Apply It Anywhere

Imagine you get to travel back in time to the first time you ever walked in a gym, and you get to implant a deep understanding of one concept in to a younger you's head. Your goal is setting "little-you" up for long term training success by injecting a comprehensive understanding of this one concept into their brain. What idea or concept would you pick?After having this conversation with a coach-friend a while ago, I think a solid case can be made for the concept of the Stimulus Recovery Adaptation (SRA) curve. If you deeply understand SRA and the concepts closely linked to it, you can apply the general idea in almost every important aspect of your training - from understanding how to train for a range of different adaptations, preventing or rehabbing a variety of common injuries, how to find optimal training frequencies, and how to get your body used to new physical challenges. Once you've got the general concept and a couple supporting ideas down pat, you can apply SRA all over the place, and have a big impact in each one. What is Stimulus Recovery Adaptation (SRA)?
SRA is a graph model that describes the timeline between a training stimulus being presented to the body, and the body adapting. All forms of training are just different ways to create a signal or stimulus that tells the body to adapt in a specific way. For example, when you lift heavy circles it is a stimulus that tells the body to get stronger. All adaptations you can train for have a stimulus that causes them, and SRA describes how we get from stimulus to seeing the body adapt across 3 main steps: Stimulus, Recovery, and Adaptation.
For the most part in this article I'll be talking about SRA on the whole body level - looking at the whole body as one big system, responding to a stimulus. It is important to know that SRA can be applied at the individual system level as well (i.e. looking at the muscular system, nervous system, etc. in isolation). Throughout the article I’ll first go through the SRA phases in general terms, and then to make things a little more tangible I’ll also explain using the example stimulus/adaptation pairing of a leg workout (stimulus) used to cause leg muscle hypertrophy (adaptation).The “baseline” SRA curve showing how performance changes across time in the 3 steps looks like this: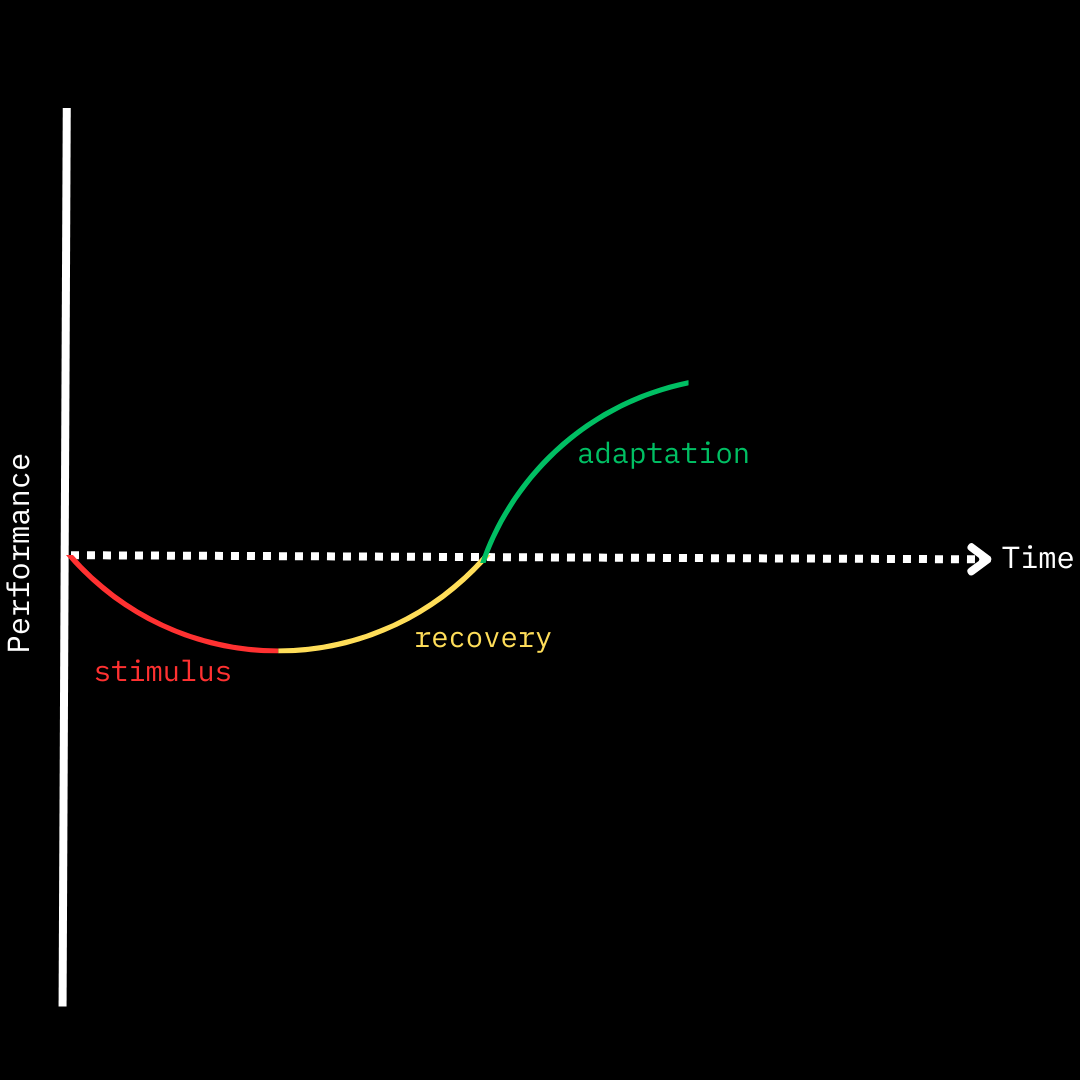
Step 1: Stimulus
The training stimulus occurs, causing fatigue and therefore a drop in performance in the body. Leg Workout Example: After you hit a leg workout, performance goes down as your body is tired and has not yet had time to recover. This drop in performance is the cumulative result of many systems in your body being stressed over the course of the workout - primarily the muscular system, but also the nervous system, connective tissues, and more.Step 2: Recovery
You body recovers to baseline performance. This generally consists of processes that repair damage and replenish resources in parts of the body that were stressed by your training. You don't make any gainz in this step, you just get back to where you were.

Leg Workout Example: This would be the period of time after the leg workout that your body takes to sort out aches and soreness in your legs, replenish resources in the muscles you used during the workout, solidify neural pathways that produce good technique - all to get you back to baseline strength and performance. Each of the body’s systems undergoes its own recovery processes, and the end result is a recovered body, back at baseline.
Step 3: Adaptation
Recovery brings things back to baseline, then adaptation continues this path to increase performance past what it was to begin with. Or to put it simply, things get a little bigger and stronger than they were before. Gainz.

Leg Workout Example: If your training is well structured, the main adaptation will be that your leg muscles get a little bigger than they were before your workout. Very nice. Other systems might adapt as a sort of “side effect” of the stimulus as well, such as back and torso muscles getting bigger and stronger, technique getting better, or connective tissues getting a little more resilient.
After adaptation, the pathway can split off in one of two directions for it's 4th step: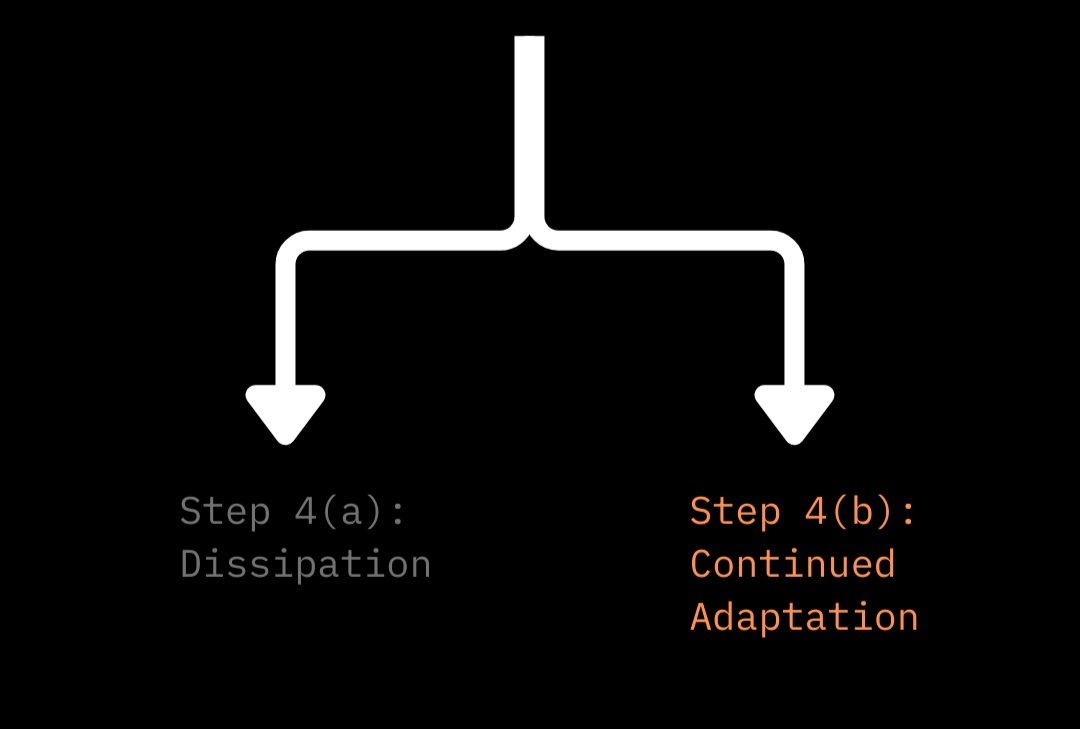
Step 4 (a): Dissipation

If no other training stimulus is presented for a long time, adaptation simply returns to baseline.Leg Workout Example: If you didn’t train your legs again for a month (...I see you) they’ll just return to baseline size. - OR -
Step 4 (b): Continued Adaptation

Leg Workout Example: If a couple days after your last leg workout you do another one, your legs (now very slightly bigger and stronger) will be able to handle a little more workload. If well timed, this second workout provides another stimulus that builds on adaptation from the last one, and causes your legs to get even bigger and stronger again. This is what we call "living the dream". The Gold Star SRA application

Behold: the baseline shape for an SRA curve - the goal of properly applied SRA is to provide a new stimulus when the body has fully adapted to the previous one, repeat this many times, and stack adaptations to the moon. I’ve been using the example of hypertrophy - but the exact same simplified model can be applied to endurance, strength, power (Issurin, 2018) and also things like tendon adaptation (Docking & Cook, 2019), or rehabilitation of different types of injuries (Aicale, Tarantino, & Maffuli, 2018). That’s a big reason I like this concept so much - you learn it once and it pops up everywhere. No matter what adaptation we're chasing in training, the aim is to create this nice shape that repeats at the right time to build on itself to get higher and higher.In your own training, well applied SRA just looks and feels like good, productive training. If you’re seeing consistent progress in the adaptation you’re after, your performance is going up week to week, your energy is not tanking (aside from normal training fatigue), and you’re avoiding significant aches, pains, and injuries then you’re probably doing a good job at making a nice, clean, and well-stacking SRA curve. The big applicable lessons can be learned from the ways people typically mess up this nicely organized SRA shape when organizing and structuring their training.Ways to mess up SRA:
Way to Mess Up #1: Providing another stimulus too soon, or not soon enough.
If another stimulus is provided too soon before the body has a chance to recover and adapt, it can cut the SRA curve short, and even cause the system to perform worse than before (Israetel et al., 2015).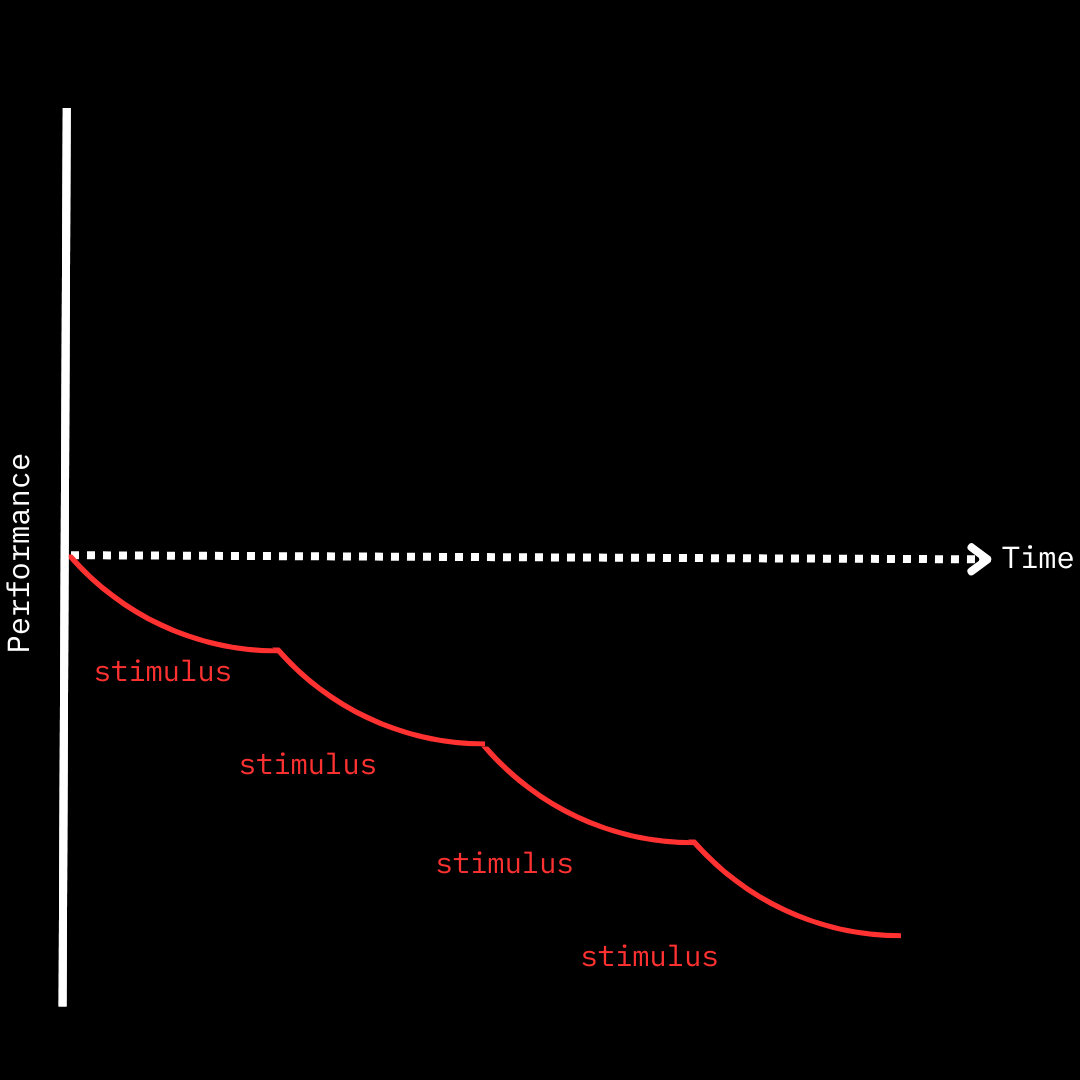
Presenting another stimulus too soon.
If you have overlapping soreness from session one to session two, if you are performing worse in session 2 than in session 1 consistently, have considerable joint pain, or are overusing supporting muscle groups it is worth taking a look at your training frequencies as a potential root of the problem. Leg Workout Example: For a leg day this could look like doing 2 leg days in a row, one after the other. Leg day #2 happens while your muscles are still sore and not adapted or even back to baseline from leg day #1, causing poor performance during your workout, and poor recovery afterwards with little to no adaptation. If you had sore quads when you entered the gym for your second session, struggled to complete all your sets during session #2, had considerable knee or hip pain, or found that your back muscle soreness and fatigue limited your workout rather than your legs then you may be providing another leg workout stimulus too soon.If another stimulus is presented too late, you leave enough time for dissipation to happen and bring your performance back to where you were before. At that point you may present another stimulus and kick off another SRA curve, but you won’t be building where the last one left off - effectively running in a circle and getting nowhere. 
Presenting another stimulus too late.
Leg Workout Example: This is like training legs once per week (or less frequently…I see you). You’ll probably think your legs are just “a stubborn body part” (or something along those lines) because they won’t get bigger or stronger, but in reality you could probably just train them a little more frequently. Way to Mess Up #2: Presenting an unclear stimulus.
The aim of training is providing a stimulus in as clear of a manner as possible - free of “static” or “noise” - that directly targets the system and adaptation you want, while leaving the others more or less alone. This is a big part of why coaches fuss over exercise selection, rep ranges, set numbers, and other programming decisions so much; they’re trying to create a clear stimulus that the body can understand as a cue to adapt. You may provide a very loud stimulus, but if it is taxing too many systems it will cause none of them to adapt, but still fatigue your body to a point where it cannot handle any more meaningful training. In essence, you’ll create the same amount of fatigue as a large stimulus, but end up with a stimulus that is too small to drive any meaningful adaptation.
Too general of a stimulus.
If you’re training hard and accumulating fatigue, yet you are not seeing progress in your desired adaptation, it’s worth checking that you’re not making this mistake. Leg Workout Example: This would be like you squatting 6 sets of 1 at 98% of your 1RM as your leg workout. While this will provide a lot of tension on your leg muscles as a stimulus for growth, squatting at 98% of your 1RM also provides a large stress to muscles of your back, connective tissues throughout your body, and the central nervous system. The tension on your legs comes at the cost of a lot of fatigue on other adjacent systems that won’t let you handle enough volume to cause hypertrophy.Way to Mess Up #3: Presenting a stimulus too large or too small
Systems have a level of stimulus they are well adapted to, or used to dealing with. Call it the “optimal stimulus zone”. It's important to understand that the zone contains a range of stimulus sizes, it is not a single precise point. Stimuli within this zone are big enough to cause a disruption to performance and kick off an SRA curve, but small enough that under normal conditions the body has everything it needs to recover from it.
Leg Workout Example: In our leg day example, let’s say that the size of stimulus right in the middle of your “optimal stimulus zone” for squats is 3 sets of 10 with 225lb. You can go in the gym and crank out 3*10 at 225 and everything recovers and feels nice within a day or two - legs aren’t super sore, accessory muscles recover well, joints feel nice, and your overall energy remains high.If too large of a stimulus is presented to the body outside the "optimal stimulus zone", the initial dip in performance will be too large compared to what the body has the resources to recover from, so the body either just barely recovers to baseline, or finishes slightly worse than where it was before. Usually this will look like you being sore for many days after a certain session, or some sort of acute pain showing up shortly after your session - two good clues your stimulus was too big. 
Too large of a training stimulus presented - body doesn’t have the resources to recover, and finishes below baseline performance.
Leg Workout Example: If one day all of the sudden you decided to do 10 sets of 10 reps at 225lb - if you’re lucky enough to escape injury, you’ll be walking like Bambi for the next week, and you might struggle to squeeze out your regular 3 sets of 10 with 225 for a while afterwards.The training stimulus can also be too small. If the stimulus doesn't quite get to the optimal stimulus zone, it won’t be enough to cause a disruption in performance, so your body has no reason to use resources to adapt. If you repeatedly give your body too small of a stimulus over a prolonged period of time it can result in more long standing decreased performance. 
Too small of a training stimulus is presented - creates a very small dip which doesn’t reach the optimal zone, and doesn’t create a big enough disturbance to cause adaptation.
You should see at least some signs that you caused a disruption during a workout - sweating, being tired after you are done, slight soreness in targeted muscles. If you’re not seeing any of this, chances are your stimulus could get a little bigger. Leg Workout Example: If one day you decide to do 1 set of 10 with 225lbs for your squat you probably won't break a sweat, you won't feel any soreness, and you'll wonder why you even bothered changing in to gym clothes. One week spent here and you probably won’t lose any significant size or strength - your baseline 3 sets of 10 at 225lbs won’t be a problem. If you stay at 1 set of 10 with 225 for the next 6 weeks it’s likely that you’ll lose some size and strength, and building back up to 3 sets of 10 will take some time.For almost all systems, this optimal stimulus zone is fluid, and can be changed with training (Docking & Cook, 2019). If you gradually provide slightly larger stimuli that push the limits of this zone, your body will adapt and become more resilient to the stimulus, moving your "optimal zone" down to bigger stimulus levels. For an adaptation like hypertrophy this is kind of annoying, because it means you'll have to do gradually more and more work to see any muscle growth. For an adaptation like tendon strength this means as you move your optimal stimulus zone down to larger stimulus sizes your tendons will be capable of handling larger and larger forces comfortably - a great thing for most athletes.
With progressive training you’ll be able to handle bigger amounts of a stimulus, but you’ll also need bigger stimuli to hit the optimal zone and cause adaptation.
Leg Workout Example: If you’re used to doing 3 sets of 10 with 225lbs, then if you do 3 sets of 12 with 225lbs the next week, then 4 sets of 10 with 225lbs, then 4 sets of 12, and eventually 5 sets of 10 your body will adapt, raising your optimal stimulus zone to higher stimulus levels. Your optimal zone moves to meet the demands that are consistently placed on the system as your legs to get bigger and stronger.Now boil it down and apply it pretty much anywhere…
Once you see the base concept of SRA, how to mess it up, and how it applies to one adaptation, you can apply it and understand it anywhere by breaking it down in to a more general formula:Identify the adaptation you want to train for.
Identify the stimulus that drives that adaptation.
Control training variables (exercise selection, intensity, volume) to provide this stimulus clearly, and at an appropriate size.
When you are fully recovered from the previous stimulus, implement another slightly larger stimulus.
Repeat step 4 (until you need to be re-sensitized to the stimulus).
Leg Workout Example: To make that a little more tangible, here’s what going through those steps would look like for our hypertrophy leg workout example.Identify the adaptation you want to train for:
Leg Hypertrophy
Identify the stimulus that drives that adaptation:
Tension in the leg muscles (mainly)
Control training variables (exercise selection, intensity, volume) to provide this stimulus clearly, and appropriately sized:
Exercise selection: choosing movements that are limited by the legs, and safely allow you to handle heavy loads at high volumes
Intensity: 5 to 0 reps “left in the tank”(between RPE5-10), with between 30-85% of 1 Rep Max
Volume: 8-20 rep range, 2-12 sets per muscle group per session, between 2-4 sessions per week (Israetel et al., 2021)
When you are fully recovered from the previous stimulus, implement another slightly larger stimulus.
Increase the amount of tension your leg muscles handle per workout by increasing volume through gradual weight, rep, or set increases.
Repeat step 4 (until you need to be re-sensitized to the stimulus).
Regularly perform leg workouts every 2-5 days while gradually increasing volume. Occasionally cycle in weeks of reduced volume training, and full months of reduced volume training even more infrequently.
The hypertrophy SRA example may seem just intuitive to some, which is good. Now you can swap out hypertrophy for any adaptation you need to pursue, and the stimulus that drives it, and you can more or less cut and paste the exact steps above to training for anything you’d like - strength, endurance, power, or even more specific things like tendon stiffness or ankle stability. The general steps remain the same, but the details will change based on the adaptation. Running through these steps for each of the main training adaptations (endurance, hypertrophy, strength, and power) can also be a good way to identify gaps in your understanding of how to train for each. There is obviously much, much more to a successful training approach than successfully applying SRA. Things like knowing which adaptation is the most impactful for you to be chasing right now, and knowing how to mold training variables to make a stimulus that is both clear and appropriately sized could both have their own full article written on them in their own right. Despite this, just knowing the SRA framework and being conscious of it when designing your training will put you miles ahead of someone who has never heard of SRA before.I could write many more pages on specific and practical ways that SRA can be applied (and I did write many more pages on specific and practical ways that SRA can be applied) but for the sake of keeping this a somewhat reasonable length, I’m hoping to release those in the future as separate articles. In the meantime, I hope you can see how SRA might already slot into your training, and how valuable the concept can be.If you have questions about how this all fits in your situation feel free to contact me or book a free video meeting with me to have a chat!Citations / References:
Aicale, R., Tarantino, D., & Maffulli, N. (2018). Overuse injuries in sport: A comprehensive overview. Journal of Orthopaedic Surgery and Research, 13(1). https://doi.org/10.1186/s13018-018-1017-5 Docking, S. I., & Cook, J. (2019). Journal of Musculoskeletal and Neuronal Interactions. How Do Tendons Adapt? Going beyond Tissue Responses to Understand Positive Adaptation and Pathology Development: A Narrative Review, 19(3), 300–310.Schmarzo, M. (2017, October 27). General Adaptation and Specific Adaptation. Strongerbyscience.com. https://strongbyscience.net/2017/10/15/general-adaptation-specific-adaptation/Israetel, M., Hoffmann, J., Davis, M., & Feather, J. (2021). Scientific principles of hypertrophy training. Israetel, M., Hoffmann, J., & Smith, C. W. (2015). Scientific principles of strength training: With applications to powerlifting. Publisher Review.Issurin, V. B. (2018). Biological background of block periodized Endurance Training: A Review. Sports Medicine, 49(1), 31–39. https://doi.org/10.1007/s40279-018-1019-9Schmarzo, M. (2017, April 6). Total system SRA. Strongerbyscience.com. https://strongbyscience.net/2017/04/06/total-system-fatgiue/